


Character Level: 90
HP:
10775
ATK:
438
DEF:
1137
ENRG:
125
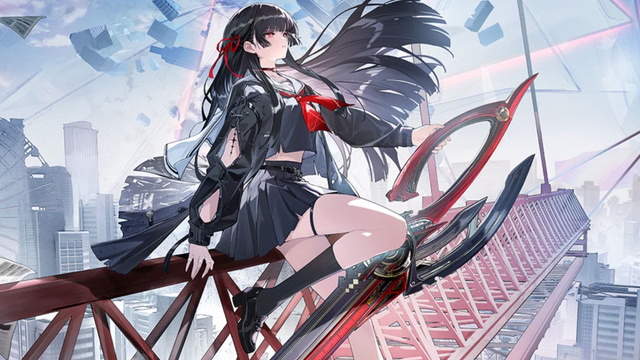
Chisa Build Guide
RRTY:
5★
Character Overview
In Wuthering Waves, Chisa is a 5-Stars Havoc character and uses Broadblade during the fight.
Character Mechanism
Unseen Snare
Chisa can mark a red triangle on enemies. This is the Unseen Snare. Its function is that whenever an enemy with this mark takes any damage, Chisa will add one stack of Havoc Bane to it.
It can add one stack every 2 seconds. Each stack reduces the enemy’s DEF by 2%. Without Chisa’s Outro Skill, the maximum is 3 stacks.
So, the first thing to do in every battle is to apply this mark to enemies.
There are four methods to apply the mark, but you only need to remember the two most common and effective ones:
Locking On: Chisa will directly apply the mark when she locks onto any enemy.
Resonance Skill: This skill has a very large area of effect, so it’s almost impossible to miss.
Chisa’s Forte Circuit
Chisa’s Forte Circuit follows a conventional design: charge the bar in the normal state, and consume energy in the enhanced state. Charging methods include Basic Attacks, Resonance Liberation, and Intro Skill.
Let’s start with normal state attacks. Chisa’s Basic Attack is described in the skill info as having two segments, but I recommend thinking of it as five segments.
The first and second segments are straightforward. The third segment involves a small dash forward. The fourth segment sees her open her large scissors, briefly charge, then snap them forward to “cut”, simultaneously providing healing to the entire team. If you continue pressing the attack button, Chisa will perform an S-shaped backstep. These five segments connected together can be considered one complete Basic Attack combo.
The third, fourth, and fifth segments have some special properties. The third segment can be chained after the Resonance Skill. Since the Resonance Skill can be used in the air, using the third Basic Attack segment after an aerial Resonance Skill will first connect into a special plunging attack, followed by the big scissor cut.
This big scissor cut has an additional effect: if you do not touch the attack button during the animation, Chisa will charge slowly before cutting. However, if you keep pressing the attack button, you will hear a distinct sound as Chisa revs the chainsaw engine, dealing an instance of extra damage and immediately executing the cut. Triggering this effect makes the action much faster.
Generally, when performing a full Basic Attack combo, you will be pressing the attack button continuously, so this effect is almost always triggered without needing special attention.
This is why I recommend simply remembering Chisa’s Basic Attack combo as five segments.
This big scissor cut doesn’t group enemies but has a strong knockback effect.
The fifth segment, besides its knockback, has another special effect: during the backstep, Chisa has dodge frames. If she is hit during this time, she will automatically trigger a dodge.
Chisa’s Heavy Attack makes her leap into the air, and you can tap the attack button to chain into the special plunging attack.
If you hold the attack button in the air, Chisa will perform a special Heavy Attack—another scissor snap—and then chain into the special plunging attack.
If this special Heavy Attack is interrupted, whether actively or passively, you can hold the attack button again before landing to perform the special Heavy Attack once more. This means you can potentially cut twice.
After the special plunging attack, you can continue into the big scissor cut.
Chisa’s Dodge Counter is also special. Besides the normal dodge counter, if you continue holding the dodge button after a dodge, Chisa will perform a move similar to her Resonance Skill, which can then be chained into the third Basic Attack segment.
Among her normal state attack designs, the most commonly used is either pressing the Basic Attack button for the full five-segment combo, or starting with the Resonance Skill and then chaining from the third Basic Attack segment.
Chisa’s Resonance Liberation
After you finish a full Basic Attack combo, the Forte Circuit Energy will be nearly full. Using her Resonance Liberation at this point will completely fill the Forte Circuit Energy. Besides dealing damage and providing a large heal, Chisa’s Resonance Liberation has another effect: for the next 15 seconds, it increases the damage multiplier of Chisa’s enhanced basic attacks by 120%, and this effect persists even if she is switched out.
Therefore, Chisa’s Resonance Liberation is an indispensable step that connects the normal state and the enhanced state. Remember to always use her Resonance Liberation before entering the enhanced state.
Chisa’s Enhanced Resonance Skill
Once the Forte Circuit Energy is full, the Resonance Skill icon lights up and changes to a chainsaw icon.
We can tap or hold to use this skill, causing Chisa to enter Chainsaw Mode.
After entering this mode, Chisa will pull nearby enemies marked with the Unseen Snare towards her—the range is quite large. Notice the distinct red lines pulling the enemies. If you forgot to apply the mark, this Enhanced Resonance Skill will automatically apply it upon activation.
As for the “stasis” mentioned in the skill description, it only occurs briefly at the very moment the chainsaw starts.
If you hold the Resonance Skill, Chisa will maintain this action, continuously sawing and gradually expanding the pull range. Notice how after holding for a while, another enemy is pulled in.
In actual combat, since this enhanced skill deals Resonance Skill damage, not Chisa’s primary Resonance Liberation damage, we don’t need to deliberately hold it to complete the full damage. In most cases, a tap is sufficient. Only if some enemies are particularly far away should you hold it a bit longer to pull them in.
Another difference between tap and hold is their derivatives. The skill description isn’t very clear. If you tap the skill, regardless of whether you then hold or mash the attack button, it will chain into the second segment of the Enhanced Basic Attack.
If you hold the skill and then mash the attack button, it will chain into the first segment of the Enhanced Basic Attack. However, if you pre-input a hold command on the attack button during the hold, it will chain into the second segment of the Enhanced Basic Attack.
Chainsaw Mode
After entering the enhanced state, Chisa’s Forte Circuit bar lights up, and her Basic Attacks change to three segments of Enhanced Basic Attacks.
The first segment is straightforward. However, the second and third segments also have special tap and hold mechanics.
Tapping the second segment shows Chisa sawing for a bit before swinging the chainsaw backward. This backward swing is the Discordance mentioned in the skill description. The damage is actually quite low, but it also possesses dodge frames.
If you hold attack button buring the second segment, Chisa will continuously consume the Forte Circuit Bar while sawing the enemy. Letting go mid-animation or dodging backward will also trigger the Discordance. But if you hold it all the way until it finishes, it will directly chain into the third Enhanced Basic Attack segment.
The third segment works similarly. Tapping it, or letting go mid-hold, will perform an action similar to Discordance called Falltone, though this one has no dodge frames.
After performing this Falltone, or after holding the third segment all the way through, Chisa’s next attack will be her leaping up to perform the Chainsaw Mode finisher. This deals relatively high damage, applies a very substantial shield to the entire team, and grants 45 Concerto Energy. Therefore, this finisher is indispensable for Chisa’s rotation.
The Forte Circuit Energy consumed by the previous Enhanced Basic Attacks increases this finisher’s multiplier—by 2.58% per point consumed, up to a maximum of 258%.
When this finisher is used, regardless of whether the Circuit Bar is fully depleted, it is immediately emptied. After the finisher, she exits Chainsaw Mode.
In practice, you typically tap the Enhanced Skill to enter Chainsaw Mode, then hold the attack button until Chisa performs the finisher.
To optimize further, you only need to hold one of the second or third Enhanced Basic Attack segments. For example, hold the second segment + tap the third segment. Since Chisa’s entire sequence can be time-consuming, we selectively sacrifice a small portion of her personal damage to achieve higher overall team DPS.
For bosses, it’s recommended to hold the second segment, because holding the second segment consumes more Circuit Energy than holding the third segment, resulting in higher finisher damage.
In AoE scenarios, I recommend holding the third segment. This is because the second segment has a strong knockback effect. If you hold it, you will push enemies far away. Even though the finisher can kill the small enemies, running back to their spawn point also wastes time.
So, choose whether to hold the second or third segment based on these two situations.
Chisa’s Rotation
Now that we’ve covered the normal and Chainsaw state moves, let’s connect them. First, for a cold start (No concerto energy) :
Chisa starts by directly using her normal Resonance Skill, then keeps using Basic Attacks until she uses the big scissor cut (4th segment). When you see Chisa perform the backstep (5th segment), you can directly use an Echo Skill + Resonance Liberation.
The reason is that without this backstep, using the Resonance Liberation would leave the Circuit Energy slightly short, but completing the backstep causes a slight overflow. So, when you see the backstep animation, the timing is perfect.
Chisa’s signature Echo Skill has its own independent animation, so we use it before the RL and use the RL to cancel its animation.
After the RL animation ends, immediately use the Enhanced Resonance Skill (tap) + hold the attack button for the second Enhanced Basic Attack segment. When you see Chisa jump, switch to tapping for the third segment, then connect into the finisher. This should fill the Concerto Energy.
For a hot start (entering via Intro Skill):
Chisa enters via Intro Skill, then uses normal Resonance Skill + Echo Skill + Resonance Liberation. Then, keep using Basic Attacks until the Circuit Energy is full. Then, tap to use the Enhanced Skill, followed by holding the second segment, then tapping the third segment, and finally executing the finisher.
Another interesting point: normally, after the RL, you can only chain into the second Basic Attack segment. However, if you use the normal Resonance Skill before the RL, you can chain into the third Basic Attack segment, just like after the normal Resonance Skill.
Chisa’s Outro Skill
Chisa’s Outro Skill provides a 20-second buff to the entire team with two effects:
During this time, when a team character hits an enemy, it increases the maximum stack count of all Negative Statuses on that enemy by 3, and the maximum stack count of Electro Rage by 3. This lasts for 15 seconds. This effect itself does not stack, but it can stack with other max stack increase buffs, like Rover (Havoc)’s Outro effect.
It allows team characters to gain the “Havoc Thread” effect when they apply a Negative Status or deal Negative Status damage to an enemy. Havoc Thread grants 18% DEF Ignore against enemies marked with Unseen Snare, also lasting 15 seconds.
For example, Ciaccona applying Aero Erosion, Phoebe applying Spectral Frazzle, Cartethyia dealing Aero Erosion damage, or Zani dealing Spectral Frazzle damage can all trigger this effect.
The actual maximum possible duration for these buffs can reach 35 seconds. Because Chisa’s Outro provides a 20-second window, and even if you trigger the effect at the 20th second, you still gain a new 15-second buff for the “+3 max stacks” and “18% DEF Ignore.”
Chisa’s Inherent Skill
Some might ask: since these buffs require the enemy to be marked, what about in multi-wave scenarios?
Chisa’s Inherent Skills provide a partial solution:
Inherent 1: When any character kills an enemy with the Unseen Snare mark, it immediately resets the cooldown of Chisa’s normal Resonance Skill, allowing her to apply the mark again.
Inherent 2: Allows Chisa to apply marks without being on-field. If a character with the Havoc Thread effect kills a marked enemy, then for the next 3 seconds, whenever that character deals any damage (note: not limited to Negative Status damage) to an enemy, the off-field Chisa will directly apply the mark to that enemy.
Therefore, the 18% DEF Ignore from the Outro effect can be considered permanent even in multi-wave content. However, the maximum 12% DEF reduction from stacking Havoc Bane cannot be carried over between waves.
Lifethread – Jetstream & Chainsaw Fever
Having covered skills and the Outro effect, let’s look at the secondary bar on Chisa’s Forte Circuit. You might have noticed it earlier: besides the main charging bar on top, there’s a yellow bar below that sometimes turns blue during certain skills. This is called Lifethread – Jetstream.
When Chisa triggers this blue bar, she can consume 50 points to perform a special dodge. If you hold the dodge button, she can glide forward a short distance. This entire animation has dodge frames and can pull enemies marked with Unseen Snare towards
How to trigger the special dodge? There are several ways:
Best scenario: When knocked into the air, you can directly trigger the special dodge. However, you cannot follow it with a dodge counter (unlike Shorekeeper).
If Chisa uses a Heavy Attack to leap up, or uses a Resonance Skill or the third Basic Attack segment in the air, she can perform the special dodge before landing.
The most unique method: During the continuous Basic Attack combo, when you perform the backstep (5th segment), if you dodge forward, you can trigger the special dodge. Dodging in other directions will not work.
In Chainsaw Mode, the special dodge is unavailable. The secondary bar turns red, becoming Chainsaw Fever. Think of it as engine inertia. It doesn’t do much by itself, but if Chisa doesn’t deal damage for a certain period, this “heat” will dissipate. If it completely depletes, the chainsaw engine “stalls,” and any unused Circuit Energy begins to rapidly drain. If you deal damage again before the energy fully drains, you can restart the chainsaw.
Character Skill Priority


Character Kit Description
Chisa Basic Attack
| Stage 1 DMG | 16.71%*2 |
|---|---|
| Stage 2 DMG | 9.55%+19.09%+66.81% |
| Death Snip DMG | 29.81%+14.91%+104.34% |
| Death Snip Additional DMG | 47.78% |
| Death Snip Healing | 1140+50.40% ATK |
| Thread Withdrawn DMG | 10.15%*2+47.35% |
| Rending Lunge DMG | 15.11%*4+90.66% |
| Heavy Attack DMG | 35.79%*2 |
| Mid-air Attack DMG | 73.96% |
| Severed Facet DMG | 44.74%*2 |
| Hanging Finality DMG | 11.93%+23.86%*2+59.65% |
| Dodge Counter DMG | 23.86%+47.72%+167.01% |
| Eye of Unraveling – Retraction DMG | 178.93% |
| Heavy Attack STA Cost | 20 |
| Mid-air Attack STA Cost | 30 |
| Severed Facet STA Cost | 10 |
| Hanging Finality STA Cost | 10 |
Basic Attack
Perform up to 2 consecutive attacks, dealing Havoc DMG.
Press Normal Attack shortly after casting Basic Attack Stage 2 to cast Rending Lunge.
Rending Lunge
Deal Havoc DMG.
Press Normal Attack shortly after casting this skill on the ground to cast Death Snip.
Use Normal Attack shortly after casting this skill in mid-air to cast Hanging Finality.
Death Snip
Open the scissors, dealing Havoc DMG. After a while, the scissors snip, dealing Havoc DMG and restoring HP for all nearby Resonators in the team.
Use Normal Attack during this skill to deal additional Havoc DMG. Use Normal Attack again to immediately snip the target.
The skill DMG is considered Resonance Liberation DMG.
Press Normal Attack shortly after casting Death Snip to cast Thread Withdrawn.
Thread Withdrawn
Deal Havoc DMG.
Can trigger successful Dodges within a certain time after being cast.
Heavy Attack
Leap into the air and consume STA to attack the target, dealing Havoc DMG.
This skill cannot be cast while in Chainsaw Mode.
Perform the following actions within a certain time after casting this skill to cast Hanging Finality:
– Press Normal Attack;
– Cast Lifethread – Glide and press Normal Attack before landing.
Hold Normal Attack before landing after casting Heavy Attack to cast Heavy Attack – Severed Facet.
Mid-air Attack
Consume STA to perform Plunging Attack, dealing Havoc DMG.
While not in Chainsaw Mode, press Normal Attack within a certain time after casting Mid-air Attack to cast Basic Attack Stage 2.
Heavy Attack – Severed Facet
Deal Havoc DMG.
Use Normal Attack within a certain time after casting Heavy Attack – Severed Facet to cast Hanging Finality.
If interrupted, Heavy Attack – Severed Facet can be cast again by holding Normal Attack before landing. This effect can be triggered once only before landing.
Hanging Finality
Consume STA to perform Plunging Attack, dealing Havoc DMG.
Press Normal Attack shortly after casting this skill on the ground to cast Death Snip.
Dodge Counter
Press Normal Attack right after a successful Dodge to attack the target, dealing Havoc DMG.
Press Normal Attack shortly after casting this skill to cast Rending Lunge.
Dodge Counter – Eye of Unraveling: Retraction
Hold Dodge after a successful Dodge on the ground to cast Dodge Counter – Eye of Unraveling: Retraction to attack and Stagnate the target, dealing Havoc DMG.
– While not in Chainsaw Mode, after casting this skill, Press Normal Attack on the ground or use Normal Attack in mid-air to cast Rending Lunge. This effect is removed when Chisa enters Chainsaw Mode.
– While in Chainsaw Mode, press Normal Attack shortly after casting this skill to cast Sawring – Blitz Stage 3.
Chisa Resonance Skill:
| Eye of Unraveling DMG | 35.79% |
|---|---|
| Serrated Loop DMG | 17.45%*8 |
| Serrated Loop Hold DMG | 7.46%*16 |
| Eye of Unraveling Cooldown | 12s |
Eye of Unraveling
Stagnate and deal Havoc DMG.
– While not in Chainsaw Mode, after casting this skill, press Normal Attack on the ground or use Normal Attack in mid-air to cast Rending Lunge. This effect is removed when Chisa enters Chainsaw Mode.
– While in Chainsaw Mode and on the ground, press Normal Attack shortly after casting this skill to cast Sawring – Blitz Stage 2.
Can be cast in mid-air.
Serrated Loop
While on the ground and Ring of Chainsaw is full, Resonance Skill is replaced with Serrated Loop.
Stagnate targets, and deal Havoc DMG and pull in nearby targets.
Casting this skill sends Chisa into Chainsaw Mode and replaces Resonance Skill with Eye of Unraveling.
Press Normal Attack shortly after casting this skill to cast Sawring – Blitz Stage 2.
Hold Resonance Skill while casting this skill to continuously attack and pull in nearby targets. Release the Resonance Skill button in the duration or keep holding it for a certain period of time to cast Sawring – Blitz Stage 1.
Chisa Resonance Liberation:
| Skill DMG | 954.29% |
|---|---|
| Healing | 2660+117.60% ATK |
| Cooldown | 25s |
| Resonance Energy Cost | 125 |
| Concerto Regen | 20 |
Deal Havoc DMG and recover HP for all nearby Resonators in the team.
Casting this skill sends Chisa into Woven Myriad – Convergence for 15s.
While not in Chainsaw Mode, press Normal Attack shortly after casting this skill to cast Basic Attack Stage 2.
Can be cast in mid-air close to the ground.
Woven Myriad – Convergence
The DMG Multipliers of Sawring – Blitz, Chainsaw Mode – Dodge Counter, and Sawring – Eradication are increased by 120%.
The bonus DMG Multiplier for Sawring – Eradication granted by Sawring- Blitz and Chainsaw Mode – Dodge Counter when Ring of Chainsaw is consumed additionally increases by 120%.
Casting Sawring – Eradication ends Woven Myriad – Convergence.
Chisa Forte Circuit:
| Sawring – Blitz Stage 1 DMG | 11.49%*6 |
|---|---|
| Sawring – Blitz Stage 2 DMG | 14.73%*7 |
| Sawring – Blitz Stage 2 Hold DMG | 14.73%*6 |
| Sawring – Blitz Stage 2: Discordance DMG | 3.58%*3 |
| Sawring – Blitz Stage 3 DMG | 14.92%*8 |
| Sawring – Blitz Stage 3 Hold DMG | 14.92%*7 |
| Sawring – Blitz Stage 3: Falltone DMG | 3.58%*3 |
| Chainsaw Mode – Dodge Counter DMG | 14.73%*7 |
| Chainsaw Mode – Dodge Counter Hold DMG | 14.73%*6 |
| Sawring – Eradication DMG | 51.54%+206.13% |
| Additional Multiplier from Ring of Chainsaw per Point | 2.58% |
| Sawring – Eradication Shield | 3800+168.00% ATK |
| Sawring – Eradication Concerto Regen | 45 |
Unseen Snare
Chisa inflicts Unseen Snare on the target for 30s in the following 4 ways:
– Hitting a target with Resonance Skill.
– Hitting a target within a certain period of time after casting Serrated Loop.
– Hitting a target with Dodge Counter – Eye of Unraveling: Retraction.
– Locking on to a target.
When targets marked by Unseen Snare take direct damage from Resonators, Chisa inflicts 1 stack of Havoc Bane on them. This effect can be triggered up to once every 2s.
Thread of Bane
When dealing damage to targets affected by Unseen Snare, ignore 18% of their DEF.
Chainsaw Mode
While in Chainsaw Mode, Chisa unlocks Sawring – Blitz, Sawring – Eradication, Chainsaw Mode – Dodge Counter.
Sawring – Blitz and Chainsaw Mode – Dodge Counter consume Ring of Chainsaw on hit.
Sawring – Blitz
Sawring – Blitz chains up to 3 consecutive attacks, dealing Havoc DMG.
Press Normal Attack to start the combo from Sawring – Blitz Stage 1. Hold Normal Attack to start from Sawring – Blitz Stage 2.
Hold Normal Attack while casting Sawring – Blitz Stage 2 to continuously attack the target. Sawring – Blitz Stage 2 is automatically followed by Sawring – Blitz Stage 3.
While casting Sawring – Blitz Stage 2, release the Normal Attack button or Dodge without directional input to automatically cast Sawring – Blitz Stage 2: Discordance, dealing Havoc DMG. Shortly after casting Sawring – Blitz Stage 2: Discordance, successful Dodges can be triggered.
Press Normal Attack shortly after casting Sawring – Blitz Stage 2: Discordance to cast Sawring – Blitz Stage 3.
While casting Sawring – Blitz Stage 3, hold Normal Attack to continuously attack the target. Sawring – Blitz Stage 3 is automatically followed by Sawring – Eradication.
Release Normal Attack during Sawring – Blitz Stage 3 to automatically cast Sawring – Blitz Stage 3: Falltone, dealing Havoc DMG.
Sawring – Blitz DMG is considered Resonance Liberation DMG.
Chainsaw Mode – Dodge Counter
While in Chainsaw Mode, press Normal Attack following a successful Dodge to cast Chainsaw Mode – Dodge Counter, dealing Havoc DMG.
Press Normal Attack following Chainsaw Mode – Dodge Counter to cast Sawring – Blitz Stage 3.
Hold Normal Attack while casting Chainsaw Mode – Dodge Counter to sustain the attack. When Chainsaw Mode – Dodge Counter ends, cast Sawring – Blitz Stage 3 automatically.
Release the Normal Attack button or Dodge without directional input while casting Chainsaw Mode – Dodge Counter to cast Sawring – Blitz Stage 2: Discordance automatically.
Chainsaw Mode – Dodge Counter deals Resonance Liberation DMG.
Sawring – Eradication
While in Chainsaw Mode, Chisa casts Sawring – Eradication in the following 2 ways:
– Press Normal Attack after casting Sawring – Blitz Stage 3: Falltone.
– Press Normal Attack after consuming all Ring of Chainsaw with Sawring – Blitz or Chainsaw Mode – Dodge Counter.
Attacking targets with Sawring – Eradication deals Havoc DMG and grants Shields to all nearby Resonators in the team for 30s.
The skill DMG is considered Resonance Liberation DMG.
Every 1 point of Ring of Chainsaw consumed by Sawring – Blitz and Chainsaw Mode – Dodge Counter increases the DMG Multiplier of the next Sawring – Eradication. Up to 100 points will be counted toward this effect.
Casting this skill consumes all Ring of Chainsaw and ends Chainsaw Mode.
Chainsaw Fever
While in Chainsaw Mode, Lifethread – Jetstream is replaced with Chainsaw Fever.
Chainsaw Fever is at 100% by default.
When Chisa goes on for a period without dealing any damage, Chainsaw Fever will rapidly deplete. Once it reaches 0, Chisa enters the Burnout State and exits Chainsaw Mode.
While in Chainsaw Mode, Chisa resets Chainsaw Fever when dealing damage or when casting Resonance Liberation Moment of Nihility, Intro Skill Reverberance – Return and Sawring – Blitz Stage 3: Falltone.
While in the Burnout State, Ring of Chainsaw will rapidly deplete. Once it reaches 0, Chisa exits the Burnout State.
When in Burnout State, Chisa exits the state upon dealing damage, or casting Resonance Liberation Moment of Nihility and Intro Skill Reverberance – Return.
Lifethread – Glide
When Chisa is not in Chainsaw Mode and has more than 10 points of Lifethread – Jetstream, she can consume 50 points of Lifethread – Jetstream to cast Lifethread – Glide in the following 5 ways:
– Press Dodge in mid-air before landing after casting Heavy Attack.
– While in mid-air, press Dodge before landing after casting Resonance Skill Eye of Unraveling or Rending Lunge.
– Dodge forward shortly after casting Thread Withdrawn.
– Press Dodge before landing when launched into mid-air.
– Press Dodge before landing after casting Lifethread – Glide.
Casting this skill can pull in nearby enemies marked by Unseen Snare.
During the skill, hold Dodge to glide a short distance on the weapon.
Can trigger successful Dodges within a certain time after casting this skill.
Ring of Chainsaw
Chisa can hold up to 100 points of Ring of Chainsaw.
Hitting a target with Normal Attack and Resonance Skill Eye of Unraveling grants Ring of Chainsaw.
Casting Resonance Liberation Moment of Nihility grants 40 points of Ring of Chainsaw.
Casting Intro Skill Reverberance – Return grants 20 points of Ring of Chainsaw.
Lifethread – Jetstream
Chisa can hold up to 100 points of Lifethread – Jetstream.
Chisa continuously obtains Lifethread – Jetstream over time.
Chisa obtains 100 points of Lifethread – Jetstream upon defeating a target.
Exiting Chainsaw Mode resets Lifethread – Jetstream to the max limit.
Chisa cannot obtain Lifethread – Jetstream passively for a short period of time after casting Lifethread – Glide.
Chisa Passive Skills:
- Inescapable Fate: When a Resonator in the team defeats a target marked by Unseen Snare, the Cooldown of Chisa’s Resonance Skill Eye of Unraveling is reset, triggered up to once every 3s.
- All Ends Here: Casting Intro Skill Reverberance – Return or Resonance Liberation Moment of Nihility grants 20% Havoc DMG Bonus and 20% Healing Bonus for 12s.When Resonators in the team with Thread of Bane defeat a target marked by Unseen Snare, Chisa gains Sight of Unraveling, lasting 3s.
While in Sight of Unraveling, Chisa inflicts Unseen Snare that lasts for 30s on the targets damaged by Resonators in the team with Thread of Bane
Chisa Switch Skills:
- Chisa Intro Skill: Attack the target, dealing Havoc DMG.
While not in Chainsaw Mode, press Normal Attack shortly after casting this skill to cast Basic Attack Stage 2.
While in Chainsaw Mode, use Normal Attack shortly after casting this skill to cast Sawring – Blitz Stage 2. - Chisa Outro Skill: Grant Resonant Thread of Closure to all nearby Resonators in the team for 20s.
While in Resonant Thread of Closure:
– When an attack hits, increase the max stacks of Negative Status and Electro Rage the target can receive by 3 for 15s. Unstackable.
– Inflicting Negative Status or dealing Negative Status DMG grants Thread of Bane for 15s.
Chisa Stat Bonus:
- Crit Rate – 8%
- Atk% – 12%
Character Burst Rotation
- Intro Skill
- Resonance Skill
- Echo Skill
- Resonance Liberation
- Basic Attack *N (Until Forte Circuit is full)
- Enhanced Resonance Skill (Enter Chainsaw mode)
- Basic Attack * 2 (Enhanced Basic Attacks 2th & 3rd)
- Basic Attack (The finisher – Sawring – Eradication)
- Outro Skill
Character Resonance Chain
S1
When applying the mark, it deals direct damage. However, it can only reduce the enemy’s health to a maximum of 61.8%.
As for the interruption immunity, the improvement in gameplay feel isn’t particularly significant because the Chainsaw state already has fairly good interruption resistance.
S2
Besides providing a modest increase to Chisa’s personal damage, it grants the entire team a 50% Damage Bonus. This value is even higher than the 40% ATK boost from Shorekeeper’s S2.
S3
This gives Chisa the capability to lead a team as a main DPS. However, it must be said that it’s somewhat limited; it won’t feel as powerful or smooth as playing with current main DPS characters.
S4/S5
These remain minor upgrades (mosquito legs). Specifically, the S5 effect “Lifethread – Jetstream consumption reduced by 50%” means the special dodge can be used 4 times consecutively in the air, which falls into the category of flashy playstyle tricks.
S6
The invincibility effect from Chisa’s S6 has no trigger limit. The following two effects are simply straightforward damage increases.
Pulling Recommendation
My personal suggestion this time is to acquire at least S0R0. Decisions regarding her signature weapon and S2 can be postponed until after the next DoT team is released
Character Build
Main Echo

Any Cost 3 Echo
Any Cost 3 Echo


Chisa Best DPS Echo set:
For Echoes, simply use the new Thread of Severed Fate set. Use Reminiscence: Threnodian – Leviathan as the main Echo. As for Energy Recharge, 120% is sufficient.
Additionally, please note that the skill of Reminiscence: Threnodian – Leviathan has its own casting animation. Therefore, it’s best to use it before Chisa’s Resonance Liberation. Otherwise, if you suddenly use this Echo skill and it gets interrupted, the loss would outweigh the gain.
Chisa Best Weapons:
Character Build
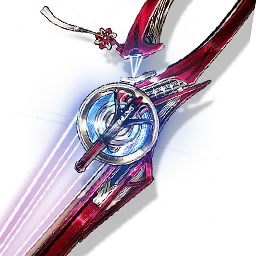
Main Weapon
Stat 1: ATK = 500
Stat 2: Crit Rate = 36%
ATK is increased by 12%/15%/18%/21%/24%. When the wielder casts Intro Skill or inflicts Negative Status, they gain 8%/10%/12%/14%/16% Resonance Liberation DMG Bonus, stacking up to 3 times for 15s. At max stacks, when Resonators in the team inflict Negative Status, grants 24%/30%/36%/42%/48% All-Attribute DMG Bonus for 15s. Effects of the same name cannot be stacked.
If you can’t get your hands on the best-in-slot weapon, Kumokiri, Then as an alternative, you can also use the Lustrous Razor
Character Team Comp

Main DPS – Cartethyia
Cartethyia is a Main DPS which part of her damage (Special Liberation) depends on the stack of Aero Erosion on ememies.
Sub DPS – Ciaccona
Ciaccona can apply Aero Erosion to enemies continuously, which can maxmize Cartethyia’s Special Reosnance Liberation’s damage. Ciaccona’s Outro Skill can also provide 100% Aero Erosion DMG bonus which is excellent for Cartethyia.
Healer – Chisa
Chisa is a well-rounded healer who also provides shields to teammates. She can reduce enemies’ DEF and allow teammates to ignore a portion of enemies’ DEF. She can also increase the maximum stacks of DoT. Additionally, she can group enemies together, creating a better AoE environment for her teammates.